2020-04-15 Wireguard Setup
Setting up a secure Development VPN
Goal
Improve the security and user experience of our AWS collaboration environment, achieving VPM benefits of:
- automatic fowarding of subdomain requests transparently
- view private AWS ip’s in a local browser
- allow “unsafe communications” eg passwords in the clear within protected & encrypted VPN tunnel
- improve user onboarding into a shared VPC instance.
Background
The need to develop securely
When developing code, if we’re honest, we leave most of the security work to the end. I’m reliant that the only port the instances is active on it 22/ssh. But spurious HTTP ports don’t get LetsEncrypt agents installed until we’re close to go-live, API’s have broken bits, and firewalls might be missing exclusions for the last three auto-built VM’s. We’re told to remove Public IP’s and and monitor endpoints, and lock down our SecurityGroups. So if time is an excuse, is there away to safely do this work later, and develop in a locked down way? Wireguard to the rescue.
Current solution complexity, SSH gets us most of the way.
IPSec and OpenVPN are hard to configure, and generally require a commercial team supporting the server side to manage configuration and they give you their own client for you to run. What about your home network or a cloud VPC? I’ve been operating the last few years under an Openssl tunnel within a tunnel. The following command served me pretty well:
ssh -A -J ${USER}@${PUBLIC_IP_BASTION} ${USER}@${PRIVATE_IP_SERVER}
ssh -o ProxyCommand="ssh -W %h:%p ${BASTION}" ${PRIVATE_IP_SERVER}
Here, above, versions of ssh client will provide you the ability to use a -J jump address argument, providing [username:]hostipmethod, of an intermediate machine, and thence only after login will the ssh command reach private ip — Whereabouts beforehand it’s not visible to the ssh client. Previous versions might only support ProxyCommand. I’ve used my ~/.ssh/config file to hide much of this complexity, by aliasing my Jump Bastion Host, and referring to that in my other ssh connections:
$ cat ~/.ssh/config
Host home
    User rupert
    Hostname ${PUBLIC_ADDR}
    ForwardAgent yes
Host desktop
    HostName ${INTERNAL_HOST_ADDR}
    P̶r̶o̶x̶y̶C̶o̶m̶m̶a̶n̶d̶ ̶s̶s̶h̶ ̶-̶W̶ ̶%̶h̶:̶%̶p̶ ̶h̶o̶m̶e̶
    ProxyJump home
    ForwardAgent yes
Host virtual_machine
    HostName ${VIRTUAL_NETWORK_GUEST_ADDR}
    P̶r̶o̶x̶y̶C̶o̶m̶m̶a̶n̶d̶ ̶s̶s̶h̶ ̶-̶W̶ ̶%̶h̶:̶%̶p̶ ̶ ̶d̶e̶s̶k̶t̶o̶p̶
    ProxyJump desktop
    LocalForward localhost:8081 localhost:8081
    LocalForward localhost:8080 localhost:8080
This config permits creation of a tunnel through my router, (both ProxyCommand and ProxyJump forms given) into my server, then into my VM:
ssh -fN virtual_machine; #bash also gives hostname completion
firefox http://localhost:8080 & #opens browser with VM ports exposed
Detailed Learning
Whilst this will remain a useful command, for legacy environments, newer linux kernels offer an extremely high performance method of securing communication between endpoints, not limited to VPC’s… containers too! Both as a Kernel module Linux <5.6 and Kernel native from =>5.6 (current and most recent stable at time of writing).
Wireguard does NOT manage key distribution management. There will be explosion in new/updated tools to assist enterprises or users to generate private keys, and distribute public keys to proxy farms. But in a couple of lines of a text file, you can configure your NAT or VPC with transparent proxy.
Official install guides: Installation and Quick start.
The key points:
wgdaemon’s identify permittedwgIP’s by the PublicKey (allowing clients to change remain connect if its IP changes)wgdaemon’s need to be told how to redirect requests to other hosts (iptables) &wgclients need to be informed where to forward VPN subnet client IP’s requests towg0(AllowedIPs)- Each unique wireguard device’s IP needs it’s own KeyPair
- User connection to endpoints is a separate process — eg
rdp/ssh/wgetare still required so yes there’s often double encryption - Secure Boot requires cryptographically signed Kernel modules. Beware changing Kernel modules, if you have trouble modprobe loading the module, perhaps turn off secure boot and test.
Client configuration format:
[Interface] Address = ${WG_CLIENT_CIDR} ListenPort = ${WG_CLIENT_PORT} PrivateKey = ${HOST_PRIVATE_KEY}[Peer] PublicKey = ${BASTION_PUBLIC_KEY} AllowedIPs = ${BASTION_PUBLIC_IP_CIDR}, ${PRIVATE_VPN_CIDR} Endpoint = ${BASTION_PUBLIC_ADDR}:${WG_SVR_PORT}
Example:
$ sudo cat /etc/wireguard/wg0.conf
[Interface]
Address = 10.0.0.2/24
ListenPort = 51820
PrivateKey = Oh6jkskLksuGj5mnjMMqnHjhkVjeoXo3yjkojdweee=
#this is what the format looks like above, not the actual one.[Peer]
PublicKey = idrclkacdlkqee0d4dflkdlj3dcxdkdkscwdldfnedd=
AllowedIPs = 10.0.0.1/32, 172.31.0.0/16
Endpoint = 13.200.10.33:51820
Server configuration format:
[Interface] Address = ${WG_SVR_DEVICE_CIDR} SaveConfig = true PostUp = ${ROUTING_RULES_AFTER_WG_INTERFACE_UP} PostDown = ${ROUTING_REMOVAL_INSTRUCTIONS_AFTER_WG_INTERFACE_RM} ListenPort = ${WG_SVR_SERVICE_PORT} PrivateKey = ${WG_SVR_PRIVATE_KEY} #DO NOT EXPOSE THIS![Peer] PublicKey = ${WG_CLIENT_IDENTIFYING_KEY} AllowedIPs = ${WG_CLIENT_CIDR} Endpoint = ${WG_CLIENT_PUBLIC_CIDR}:${WG_CLIENT_PORT} #OPTIONAL
Example:
$ sudo cat /etc/wireguard/wg0.conf
[Interface]
Address = 10.0.0.1/24
SaveConfig = true
PostUp = iptables -A FORWARD -i %i -j ACCEPT; iptables -A FORWARD -o %i -j ACCEPT; iptables -t nat -A POSTROUTING -o eth0 -j MASQUERADE
PostDown = iptables -D FORWARD -i %i -j ACCEPT; iptables -D FORWARD -o %i -j ACCEPT; iptables -t nat -D POSTROUTING -o eth0 -j MASQUERADE
ListenPort = 51820
PrivateKey = cjdfjfjedjcndjsjwiw32895tfudeidjeiurfufudue=
#this is what the format looks like above, not the actual one.[Peer]
PublicKey = 2iskdkrktirtidfei439rdkddmvcnbcvzxvcasgwyeue=
AllowedIPs = 10.0.0.2/32
Endpoint = 221.140.210.02:51820
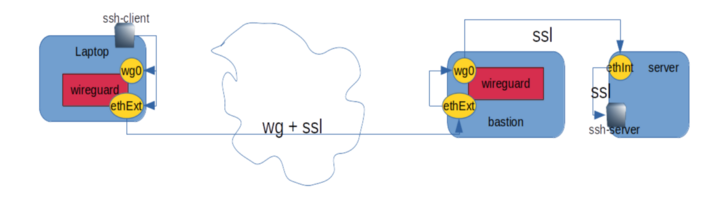
This creates a “wireguard network” of 10.0.0.1 <-> 10.0.0.2. This will push any instructions for 172.31.0.0/16 (e.g. ssh or firefox etc.) on the client side down the clients wg0 interface. These arrive on the server’s own wg0 wireguard interface over the internet encased in WG protocol encryption from it’s public network device. Further forwarded to hosts visible to the server network internally.
Keys are dead simple because there is no protocol choice. If a cryptography protocol is ever compromised, Wireguard will push an urgent upgrade with another protocol or version. Hence the key generation is an asymetric private key of one type, the public is derived from it, and those will identify the client/server from that point on:
wg genkey | tee privatekey | wg pubkey > publickey
Once communications can and symmetric keys are transferred. Roaming can begin, as clients are identified by Public Keys, not their origin. Very Powerful for DDoS protection.
The installation guides are pretty good, but a note: because anything before Linux Kernel 5.6 is using a Kernel Module, you’ll might need to turn off secure boot in the BIOS. I added the wireguard module to the enabled modules
echo 'wireguard' | sudo tee -a /etc/modules-load.d/modules.conf
You will also need to forward ipv4 routes on server too with:
FORWARDING='net.ipv4.ip_forward=1'
sudo sysctl -w "$FORWARDING"; #current running OS environment
echo -n "$FORWARDING" | \ #persist the settings
sudo tee /etc/sysctl.d/01-wireguard.conf;
Outcome
These settings for the VPN can be made persistant with sudo systemctl enable --now wg-quick@wg0.service. This means that you can get valid HTTPS certificates for self signed certificates of internal RFC1918 address ranges. Great for testing internally.